Wednesday, April 29, 2015

Scratches, bruises and a perfect black eye


  • Illamasqua neutral palette
  • Gosh trio eye shadow Tropic Fever
  • Catrice Plum up the jam
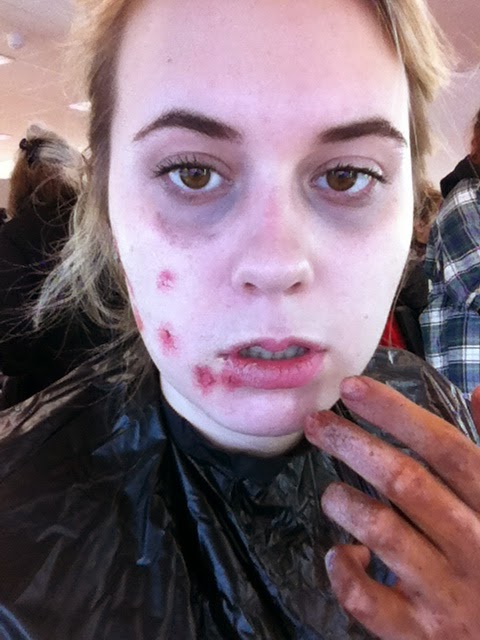
For the perfect bruised black eye i used mix of dark colours and bright yellow with blue. With darker colours I created a bruise in the inside of the eye, where naturally blood would accumulate and on the highest points of cheekbone and eyebrow bone  - more bruised look with blue and yellow colours. It helped to create a bruise with different colours and tones and made it look more natural


Scratches
  • Red paint
  • Fake blood
  • Eye lash glue
For scratches spread eye lash glue on certain areas where you want the scratch to be and let it dry. After drying rub it a little bit with your finger to make the glue come of and look like scratched skin. After that you can add red colour paint inside the just made scratch and if wanted - a little bit of blood to make it more realistic and new.


Dark Eyes And Lips


  • Make up academy Glamour Nights Palette
  • Illamasqua Neutral Palette
  • Mac Lip pencil
  • Mac Lipstick
For the dark eyes and lips it is obviously important to use dark colours. Even though it is dar eye look it is important to follow certain rules like blending, transition colours. I used mix of colours on the eyes, blended the edges and went with a line to the inside corner of the eye to make them look even darker. 
For the lips I firstly used lip liner around the edges of the lips and them filled them in. After that I used a bit different colour of lipstick to make the lips more ombre looking.

Wednesday, April 22, 2015

Contemporary Victorian Hair styles, inspired by American horror

  1. Firstly separate the hair on the side and curl three curls on one side, two on the other
  2. Pin every curl you have curled to cool down
  3. Separate back hair from the front and side parts and curl curls two on each side, one big below them so you would loose the unwanted separation of the hair and curl two curls again to the bottom of the hair
  4. Curl sides towards the face
After curling and letting them cool down nicely remove the pins and move hair so you would get nice 50`s waves all over the head.


After doing the first part just brush hair very nicely without ripping hair out - always keep hand below the brush. After brushing all the hair the result should be some loose, voluminous waves .


After the second hairstyle just put the head down and move it to the sides quite hardly if working on Katy. If your model is alive let them put their head down and just move hair from the roots quite hardly as well with your finger and you should get a messy curls look.


Creating light scaring, using molds ,how to attach to the skin, how to colour

What to use:
  • Petrolys
  • Release spray (it releases silicone)
  • Latex
  • Witch Hazel
  • Fixer spray
  • Powder
  • Vaseline
  • Pros - aid


  1. Use fixer spray before any liquid, it helps with the colour
  2. Powder it so it wont stick
  3. Cover a piece of mold with glue with baby bud and glue on arm (surface)
  4. Make sure it`s tacky before putting it on the arm
  5. Press onto the skin so that all of it is stuck, work on the edges
  6. When the mold is on stuck to the hand take witch hazel and a baby bud and blend the edges with it
  7. Take some colours and colour it so it just doesnt sit on the surface
  8. Make colours more transparent, use moisturizer to help with the colours
  9. Powder it if its a bit tacky
  10. Put different tones of colours so its more 3D looking, if its a new cut -less bruising


Creating Estelle image


So this is the hairstyle I chose. The front of the hair is parted on the side (finally, we can do it!!!) and pinned into the back of the hair in upwards direction. Sides sleeked back, pinned into the back of the hair as well and if there`s any long hair (as my model is basically shorthaired and I used extensions) curl it. The top of the hair is backcombed for some volume and falling down. The bottom of the hair (parts where I added extensions) was curled and pinned to the middle of the head so the sides could be clean and smooth.
 As I said, for the make-up I chose a very natural look, nothing over exaggerated - natural skin coloured foundation with blusher on the apples of the cheeks as it was fashionable to do it this way. For the eyes I used a little bit of eyeshadows (natural brown colour to the crease and a bit of light colour on the lid to make the eyes look healthy and to pop the out a bit). I contoured her face very lightly but not to make her cheekbones pop out or anything, just to make her more healthy looking and more 3D-imensional rather than just a very compressed face. I used some mascara to show off her eyes even more and put a bit of a natural lip gloss to her lips. Now, when I`m thinking I could have used something a bit more pinkish for the lips but I`m pretty sure I was still waiting for loads of lip colours to be delivered to my place so I used what I had at that moment.

Burns, how to recreate, with different products

What to use -

  • Block gelatin
  • Gellax (good for paterns as well)
  • Glycerin (good for sweat)
Everything can be washed with warm water
Safety:
  • Be sure that gelatinbe is not burning - try on yourself
  • Metal can get very hot easily
  • Mix what you want with gelatin but after microwaving it (except simple colours)


  • If you microwave something in plastic - put it in water, if something dry - in a dry bowl
  • Check after every 15sec
  • Everything you make a burn with dries really quickly - make sure you dont leave any edges
  • You can layer it up but make sure it is patted so it gives roughness
  • When it is not sticky it means it`s dry
  • Powder over gelatin or gellax
  • Use a fine brush and supra colours to make it realistic
  • Think about the burn - if from fire - a bit of black etc. 
  • From the sides with the lightest colours to the middle of the burn with the darkest - think about it
  • You can add a bit of blood. It`s all about building up.


Practice look of Miss Havisham both hair and make up technical classes

Miss Havisham First Make-up and Hair Practice

Miss Havisham Second Hair Practice


Miss Havisham Third Hair Second Make-up Practice


Estella Make-up Practice


Victorian hair style-Estelle and Miss Havisham


  • I created Miss Havisham in her early years, in early Victorian era because it was easier to work with my model as she has short hair and I wanted to show Miss Havisham during her process of going crazy. 
  • I parted her hair in the middle into two sides and parted the back just behind the ears in the straight line from side to side. 
  • I seperated Chealsea`s hair sides into 2 sections - upper and lower one and both of the sections had 2 curls curled towards face. 
  • The back of the hair I made into a bun and platted a simple plat which I wrapped around the bun a bit lower as people would usually do because early victorian era was about simple short, low hairstyles.


I wanted Estella to be natural looking with long curled hair because that`s how she is shown in the film and book.
I really liked the idea and look of Estella in 1998 "Great Expectations" by Alfonso CuarĂ³n. Gwyneth Paltrow was chosen for Estella and I think it`s a perfect match as Gwyneth is so sophisticated and elegant, so calm, skinny and beautiful. That`s the idea of her personality I wanted to show. A very fragile from outside but strong from inside.
So, my final look for Estella this is what I chose


  • The front of the hair is parted on the side and pinned into the back of the hair in upwards direction. 
  • Sides sleeked back, pinned into the back of the hair as well and if there`s any long hair (as my model is basically shorthaired and I used extensions) curl it. 
  • The top of the hair is backcombed for some volume and falling down. 
  • The bottom of the hair (parts where I added extensions) was curled and pinned to the middle of the head so the sides could be clean and smooth.

Historical Victorian hair

Victorian hairstyles became more loose and way nicer by the time. At first it was styled quite to the face - concentrated to the sides of a face and on chin level. Cutting hair was very unfamiliar to them because firstly, it was way easier to make long braids with long hair. Loose hair was only appropriate for kids, adults had to wear it braided or put into a bun which was different than the Elizabethan one. Also, everything had to be very symmetrical as well, hair parted in the very middle. 
The most common hairstyles of Victorian era during 1830-1860. As you can see, hair was styled to the chin level and quite simple as well. different kind of bonnets was popular so sometimes women put them in the hairstyle.


 In late Victorian era hairstyles were quite different compared to earlier in the same era. After a long time, women`s ears were shown, but the top of the hair remained flat. In about 1870's the back of the head started to be more voluminous. Girls usually used fake hair as well. Platting was still popular so as were curls. The main thing about late Victorian hairstyles was that it was going upwards. Don`t know how explain it properly, but the front hair was pinned not into the bottom of the hair but into the top, voluminous hair at the back as I said before.
These are the most typical late Victorian hairstyles - Front flat, back big and the hair in the back curled. Hair accessories were used quite often as well. Bonnets stayed fashionable since Elizabethans


Theatrical ageing/Creping of the skin

Theatrical ageing is about emphasizing the lines we get as we get older. 
  • The main thing is to choose a greyish brown colour and draw lines everywhere where they naturally appear - forehead, under eyes, nose mouth, chin. 
  • Ask your model to make some funny faces to get the lines more easily. 
  • Highlight what is left with light colour and blend everything but not too much - it is important not to loose the original lines. 
  • In TV and films do not use white colour for face - mix it with a little bit of yellow. 
  • Put a little bit of foundation on lips to make them look dry and old
  • Dry teeth with baby bud or a tissue and put on Kryolan tooth enamel
  • For broken veins on face use a sponge and red mixed with black
  • If want to make skin look older use latex  - stretch the skin as much as possible, put on latex and dry it with cold hair dryer


Consultation notes used in studio

Name - Chealsea Lake
Age - 20 years old
Hair type, colour, natural or dyed -  Natural hair colour, no damage
Skin type - Normal
Skin tone - Light yellow
Eye colour/shape - Blue/green, even eyes
Alergies/medications - None
Contraindication - None

Photographs of trials in studio

Miss Havisham (Continuity)


Annotated Face Charts with list of products used

 Face - Illamasqua Matt primer, RCMA VK11 ivory+porcelain and Illamasqua skin base mixed with Kryolan supra colour in black
Eyes - Catrice plum up the jam, Urban Decay Jilted
Lips - RCMA VK11 foundation over the lips


 Face - RCMA VK11 + Illamasqua foundation (01), Illamasqua sculpting powder for contouring, blush - Illamasqua "Libido"
Eyes - Base - Illamasqua "Stealth", crease - Illamasqua "Obsidian"
Lips - Illamasqua "Libido"
 Face - Foundation RCMA VK11, blush Illamasqua "hussy"
Eyes - brows Catrice brow pencil,  crease Illamasqua Obsidian, highlight Illamasqua Lumos, Liner Illamasqua Wolf
Lips - MUA Pucker Up, Essence liner in 10

Face - foundation RCMA VK11, blush Illamasqua Hussy
Eyes - eyelid Catrice Plum up the jam, liner Illamasqua Wolf

List of products/material used.

  • Mac lip mix package;
  • Mac mixing medium package;
  • Mac glitter (gold);
  • Mac brush 263;
  • Urban Decay Palette (Naked 2);
  • Illamasqua Matt Primer;
  • Illamasqua Loose powder (010);
  • Illamasqua skin base foundation (01);
  • Illamasqua sculpting powder duo;
  • Illamasgua cream blusher (libido);
  • Illamasqua blusher duo;
  • Illamasqua reflection palette;
  • Illamasqua neutral palette;
  • Charles fox mini lop rouge palette 16 colours (lmp101);
  • RCMA foundation palette (vk11);
  • Charles fox supra palette 12colours (FP);
  • Charles fox aqua palette 12 colours (fp)
  • Sigma brushes (F50, F20, F25,F10, E45, E10, E35, E20, L05, E25, E15, F75, F50, F65, F35, F15)
  • Gellatine;
  • Gelax;
  • Glycerine;
  • Liquid Latex;
  • Fixer spray;
  • Kryolan tooth enamel;